My wife has an iPhone 15 with 512GB internal storage. Today, she asked me to back up the photos on iPhone so she could delete the old photos to free up more storage. I thought it could be a simple task. It turns out I am completed wrong. It took me several hours to transfer 200GB photos from iPhone to my MacBook Air (Apple Silicon M4.) The best way is using an external hard drive on Mac as your Mac might not have enough free space for saving the iPhone photos in such a large amount. And the external hard drive (SSD) is cheap and fast now!
As we know, iPhone had been dominated the best-selling list of smartphone for the past few years. As a former iPhone 6S (currently Samsung Galaxy phone users), I have very a big complaint about iPhone and the problem was never solved for many years. It is very hard to backup the photos and media files from iPhone to computer.
Now, this issue is even bigger as the storage of iPhone increased. The entry model storage went from the 32GB to 128GB. You have to copy and backup more photos and media files when comparing to the past and now. It is a huge pain to do this out of Apple’s ecosystem. Fortunately, I have a Mac to do and it will save more time when doing it on a Windows PC.
Preparations
Transferring iPhone photos to an external hard drive or SSD seems an easy task. But this is not the case for large volume. To get the job done, you have to make some preparation first.
- Portable SSD. For iPhone backup. Hard drive and SSD are both fine. However, SSD is more recommended as it is much faster than the traditional SSD. In addition, the external SSD in large storage is quite cheap now. If you have enough, pick up the one from reputable brands, such as Samsung, Intel and SanDisk.
- USB to Type-C cable. Most Mac models such as Apple Silicon MacBook Air, MacBook Pro only have USB-C port. You have to buy a USB to Type-C cable if the external hard drive or SSD only has USB port.
- Mac. Based on my own test, the transfer speed on Mac is much faster than Windows PC. I am using the same iPhone and external SSD.
- Format external drive to APFS. By default, the external hard drive you bought is formatted by FAT32 or exFAT, which is not friendly on Mac. To save time and avoid potential error, it is better to format the external drive to macOS’s native file system APFS on model Mac or Mac OS Extended (Journaled) on old Mac.
How to Transfer Photos from iPhone to External Hard Drive on Mac
Step 1: Connect the iPhone to Mac via USB cable. You have to trust the connection on your Mac and iPhone. Once the permission is granted, you will see the device name from the Finder sidebar.
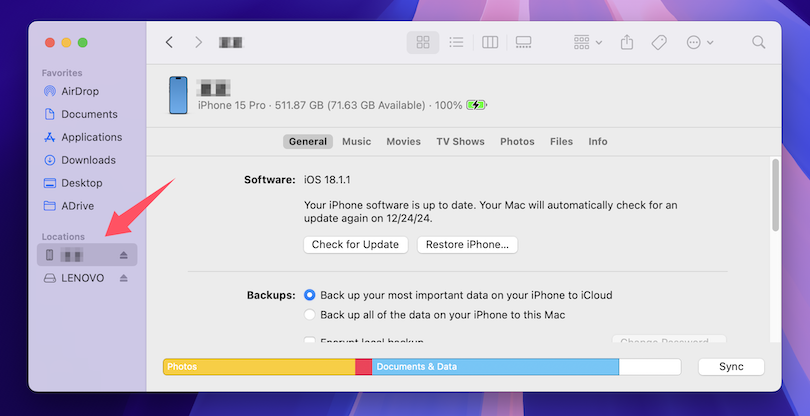
Step 2: Plug in the external hard drive or SSD to Mac and allow Mac to access this drive when you see the prompt. Upon success, the device name will also show up in the Finder app. In addition, you’d better to format the drive to APFS or Mac OS Extended (Journaled) using the built-in Disk Utility app.

Step 3: Open the Launchpad app and search for “image capture app.”

Step 4: Run the Image Capture app and unlock the iPhone as it asks. Wait a minute and you will see all the photos and videos from this iPhone. To transfer iPhone photos to an external hard drive or SSD on Mac, you should choose a local folder of external drive under the “Import To:” menu by clicking the “Other…” option.
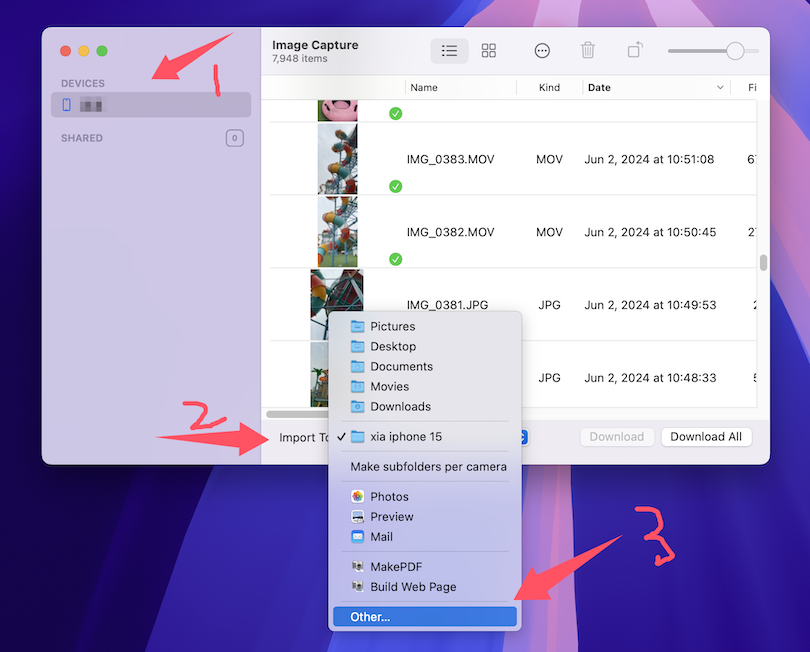
Step 5: Now, select the images with control or shift key. And drag the scroll bar at the right side. After selection, click the “Download All” button to start the transfer. As you can see, there are 2756 files are selected and they will be copied to the external hard drive on my Mac.
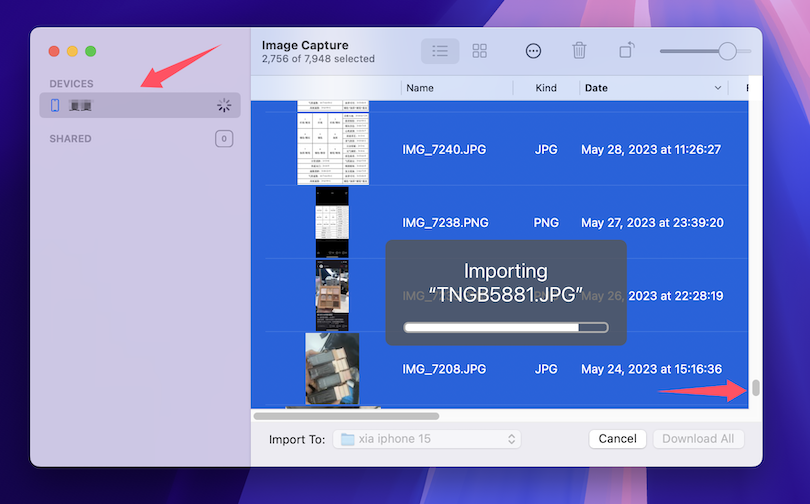
Step 6: Leave the Mac along and wait for the iPhone photos being copied to external hard drive or SSD on your Mac. This will take a while, which depends on how many files to be transferred. For me, it took about two hours to fully backup all 7948 photos and videos. They takes about 220GB storage.
Pros and Cons
There are multiple ways you can follow in order to back up iPhone photos to external hard drive or SSD on a Mac. The Image Capture app is one popular options. And it comes with advantages and disadvantages when comparing to other backup methods.
Pros:
- No need to install additional software.
- Takes less time to import and display all photos on iPhone.
- Photos are easily sortable ordered by created time.
- Much faster transfer speed and save time.
- Photos are viewable and sharable after transfer.
- Don’t eat up the storage on your Mac.
Cons:
- Need additional adapter to connect iPhone and external drive.
- Album and folder name are missing after import.
- The app could crash at the middle of the task if there are two many photos to be transferred.
Tips for Backing up iPhone Photos to External Drive
It couldn’t be that easy even you know all the steps described above. In fact, I did this two times in order to backup all photos from iPhone to external drive. Hence, it is also crucial to learn some additional tips to reduce the time.
Plug in the Power Adapter
If the photos are more than 100GB, I highly advice to connect your Mac with the powerful adapter as the transfer task will take longer time to complete. If the battery drains, the process could stop for sure. This is especially important for these old Intel Macs, which batter drops very quickly.
2. Set Mac Not to Sleep
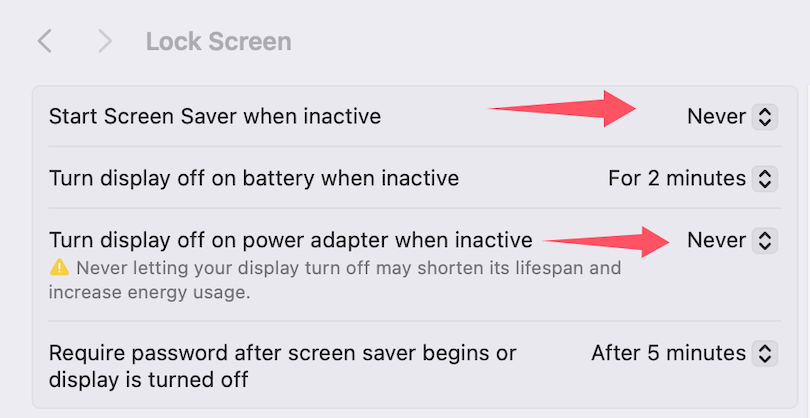
Your Mac could get into sleep with the default display settings. This could interrupt the transferring process as it could take hours to complete if the photos are in super huge chunk. So it is recommended to set the Start Screen Saver when inactive to Never and Turn display off on power adapter when inactive to Never.
3. How to restart if Image Capture app quits unexpected
This is one of the issues you might come across when using the Image Capture app to import iPhone photos into external drive on Mac. The chance is high with large amount. Unfortunately, you can restart from the break point quite easily.
First, go to the folder on the external hard drive or SSD and sort the files by Date Modified. Scroll down to the bottom and note the date of last file.

Next, open the Image Capture app and click on the device name from the left side. By default, the photos are displayed in the descending order by date. After that, locate the same file of the same date from the break point in the first step. Finally, select all the files from the beginning to the end by scrolling down the sidebar.
Conclusion
The time and effort could be much more than you expected though it sounds like a simple task. It brings more challenges when there are two many photos for backup. You should follow the suggestions carefully to avoid the additional time it takes. It might be hours for restarting the task. Currently, this is the fastest way I found to copy photos from iPhone to external hard drive or SSD on a Mac.
If you don’t like this trick, there are a couple of iPhone device management software you can take advantage of. They usually comes with a more user-friendly UI and the album names are kept after transfer.