Today I want to share a computer problem I personally experienced: The bootable USB disk created with Rufus cannot be detected by Windows 11/10. This problem has troubled me for a long time, but I finally solved it, so I decided to write an article to share my experience.
Below are some solutions I have tried myself. Finally, I will also introduce a better tool WinBootMate, which helped me say goodbye to the “trouble” of Rufus. Now, let’s get to the point!
What’s the Problem
I created a Windows boot disk with Rufus. After connecting it to my computer, I noticed that the USB disk is not detected at all in the boot menu or system. What’s worse is that sometimes it works well on other computers, but it can’t be found on the new computer.
This problem may be caused by the following reasons:
- Incorrect BIOS settings
- File system problems of USB disks (FAT32/NTFS format errors)
- Incorrect parameter settings when creating the boot disk
- Rufus version compatibility issues
- USB interface or hardware problems
5 Fixs for Rufus Bootable USB Not Be Detected in Windows 11/10
Fix 1. Check BIOS settings
Before troubleshooting, check your BIOS first. Usually, your computer’s boot order may not be set to boot USB first by default. Here are the steps:
1. After turning on your computer, press F2, DEL, or F12 (the specific key varies depending on the brand) to enter BIOS.
2. Find the boot menu or boot order.
3. Make sure the USB drive is the first boot item.
4. If your computer supports UEFI mode, check if UEFI boot is enabled. If it still doesn’t work, try switching to Legacy mode.
At that time, I found that BIOS disables USB boot by default. This simple setting directly solved part of the problem.
Don’t miss: The Easy Way to Install Windows 11 on Unsupported CPU (10 Mins)
Fix 2. Make sure the USB flash drive is formatted correctly
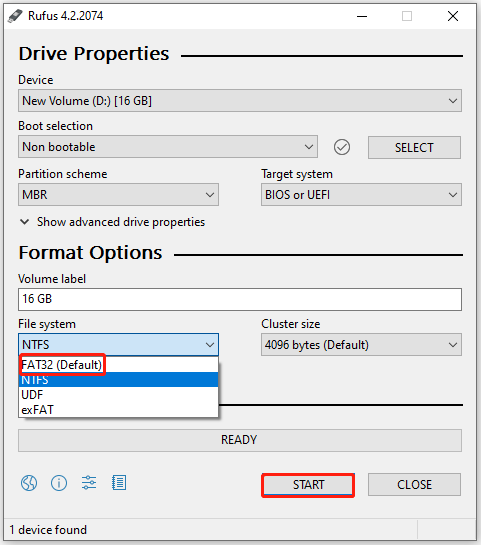
When creating a bootable USB disk, Rufus will ask you to choose the file system format: FAT32 or NTFS. Windows installer usually requires FAT32 format, especially in UEFI mode. However, if the file is too large (e.g. a Windows image), Rufus may default to NTFS and not recognize the USB drive.
1. Insert the USB flash drive.
2. Open Rufus and select the image file.
3. Force FAT32 in the file system options.
4. Recreate the boot disk.

This step is very critical. I didn’t pay attention and selected NTFS by default. As a result, the BIOS didn’t recognize it at all. I solved it after changing it to FAT32.
Fix 3. Replacing the USB interface
Many of you, like me, may not think about hardware when you first encounter a problem. However, lack of power supply or damage to the USB interface can also cause the U disk to not be detected.
My solution is.
1. Try switching the USB interface on the back of the motherboard in favor of USB 2.0 instead of USB 3.0 (some older motherboards do not support USB 3.0 well)
2. Make sure the interface is clean and free of dust and that the USB flash drive can be used properly with other devices.
Changing the interface seems easy and is often overlooked; after switching to the USB 2.0 interface, the boot disk was recognized immediately.
Fix 4. Switch to another version of Rufus
Rufus version compatibility issues can also cause problems, especially since newer Windows images may require specific support for the Rufus version.
What I am doing is
1. Download the latest version from the official Rufus website.
2. if you still have problems with the latest version, try using an older version (e.g. Rufus 3.15 or earlier).
3. check the image file for corruption and re-download the Windows ISO file if necessary.
Fix 5. Try WinBootMate – Alternative to Rufus
Finally, I recommend the “life-saving tool” – WinBootMate. This is a tool I tried at the suggestion of a friend, much easier to use than Rufus, and has never changed for me.
Advantages of WinBootMate:.
– Create bootable USB drives for various types of Windows images.
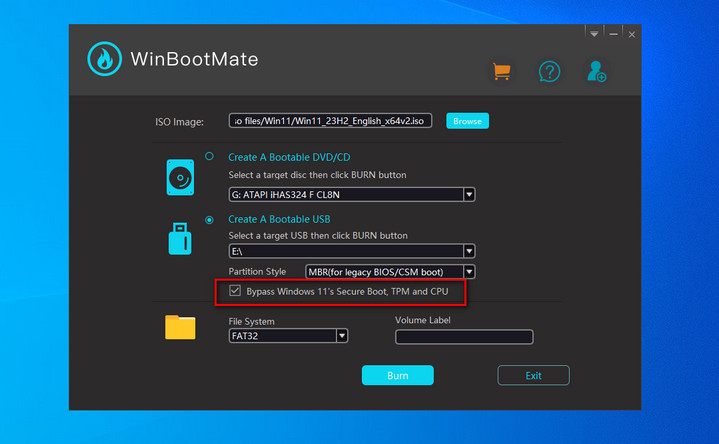
– Bypass system requirements like TPM, Secure Boot and CPU.
– The operating interface is very intuitive and suitable for beginners.
– No need to adjust the BIOS yourself, it automatically adapts to UEFI and legacy modes.
– Improved handling of large files (supports automatic partitioning).
– Faster production and higher success rate.
Simple steps below:
Step 1. Download and install WinbootMate on a Windows or Mac computer.
Step 2. Insert a USB drive (at least 8GB recommended) into your computer.
Step 3 . Import your ISO file to it and select Partition style, MBR or EFI.

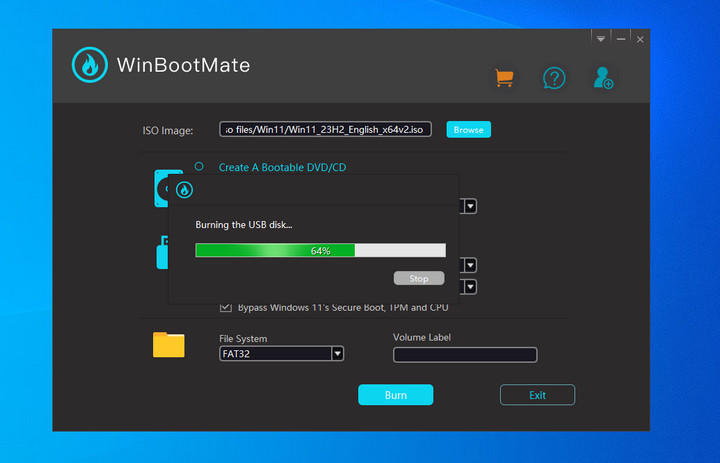
Step 4. Start to writing ISO to USB.

Since replacing Rufus with WinBootMate, I no longer encounter problems with USB disks not being detected. It was really nothing to worry about!
My Thoughts
I must confess that this time I struggled with the problem of not being able to detect the Rufus bootable USB in my Computer. It gave me a deeper understanding of the truth that fixing a computer is never a step-by-step process, but a combination of “test + error ++ luck”.
During this experience, I also learned some general experiences regarding computer maintenance. I would like to share these with you. I hope it will be useful to you.
1. Don’t be afraid to fight, there is always an answer to your question
The most taboo thing to do when encountering computer problems is to “blindly trust the information” or be reluctant to verify the information. I tried Rufus several times, but it still did not work and I almost gave up. However, after some research on the Internet and advice from friends, I solved the problem by changing my method. Search more and ask more people. Many questions are actually not that complicated, but patience is needed.
2. Hardware and software issues need to be investigated separately.
This question intertwines hardware and software possibilities; in fact, after careful analysis, they can be identified one at a time.
– Software problems: formatting errors, incorrect Rufus parameter settings, ISO file corruption.
– Hardware problems: insufficient power supply for USB interface, motherboard incompatibility.
In the past, we always suspected software problems first, wasting a lot of time on repetitive operational operations. Later, I realized that the hardware could also be the “culprit”.
3. New tools can be made into shortcuts
After trying WinBootMate, I realized the importance of tools. Rufus is well known, but for beginners it has too many configuration options and can easily run into trouble. Also, using a tool like WinBootMate simplifies many unnecessary steps and greatly reduces the failure rate. Therefore, if you find that a tool is not appropriate, do not give up and try other options. In many cases, you will get twice the results with half the effort.
FAQs
Q 1. Why is my Rufus bootable USB not detected in Windows 11/10?
There are many reasons for this issue, including:
– USB boot option is not enabled: check the BIOS settings to make sure that the USB boot sequence is correct.
– File system incompatibility: if you choose NTFS instead of FAT32 when creating a boot disk, your USB flash drive may not be detected. Try reformatting to FAT32.
– Hardware problems: Your USB flash drive may not be recognized due to a problem with the USB interface or the USB flash drive itself. Try a different interface or USB flash drive.
– Rufus configuration problems: Make sure that Rufus is using the correct image and configuration. We recommend using the latest version of Rufus.
Q 2. What should I do if the boot disk is not recognized even after changing the USB interface?
If you change the interface and it is not recognized, the cause may be other problems. power:
– Try inserting the USB flash drive into the USB 2.0 port on the back of the motherboard instead of the front panel or USB 3.0 port.
– Check if the USB flash drive is damaged and check if it can be used properly with other devices.
– Make sure that the USB port is not physically blocked or contaminated with dust.
Q What is WinBootMate and why do I recommend it?
WinBootMate is an easy-to-use tool designed to create bootable Windows disks. It is simpler and more stable than Rufus, especially suitable for novice users. WinBootMate automatically selects the appropriate boot mode (UEFI or Legacy) according to your system type, avoiding many manual configuration problems and increasing your success rate. If you find Rufus too complicated, WinBootMate may be a better choice.
Q 4. What should I do if WinBootMate does not work?
If WinBootMate does not solve the problem, we recommend that you try the following steps:
– Make sure the ISO file is not corrupted and you can re-download the latest Windows image.
– Check if your computer supports UEFI or Legacy mode and check if you need to change the BIOS settings.
– Create a bootable disk using another computer to determine if the problem is not a problem for your computer.